Description
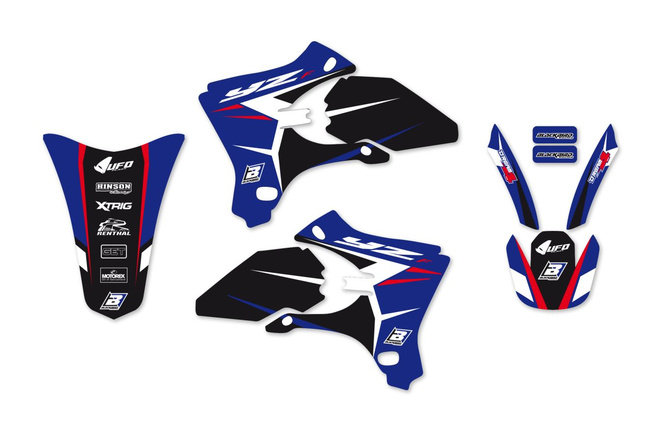
Blackbird Graphic Kit Yamaha YZF 250 / 450 2003
Blackbird is known for high-quality decal kits and seat covers for motocross bikes. By using a decal kit you can change the look of your bike without having to replace the entire fairing.
Blackbird High Quality MX Decals:
Blackbird stickers are made of 0.5 mm thick vinyl (or Christal). In combination with the extra strong adhesive, they are ideal for intensive off-road use. The colors are also very resistant and provide a long-lasting shine.
Including:
- Sticker front mudguard
- Sticker front mask
- Sticker fork protectors
- Sticker radiator panels
- Sticker rear side panels (+ airbox and shock absorber cover)
- Sticker rear mudguard
- Sticker swingarm
Graphic kit: instructions and tips
Gluing on decal kits for motocross bikes, 50cc motorcycles or even scooters doesn't require much in the way of materials and tools, but you should keep a few things in mind to ensure a good fit and long-lasting adhesion.
The following information is especially helpful for beginners, as you'll learn what the basics are for a clean result.
Preparation: What is the best way to prepare the fairing?
First, you should check the condition of your fairing parts. Cracks or deep scratches are an absolute no-go, as the decals simply won't stick. In this case you should consider buying a new body kit / plastic kit.
New fairings have a glossy coating that needs to be removed from all surfaces where the decals will be applied. Simple and effective: brake cleaner and a clean, lint-free cloth.
The only tool you'll need to apply the new decals is a hair dryer or hot air gun. Our tip: it is best to work in a clean, warm room.
Tips for application:
There are several methods, we rely on a common method that we think is best for when you want a perfect finish and want to enjoy your new graphics for a long time.
The decal kit can be applied to plastic parts that have been removed or are still attached to the vehicle, whichever you prefer. We recommend the method of leaving the panels attached to the vehicle, as it provides a better estimation of sticker placement and alignment. Vehicle parts that could interfere with the application (e.g. the seat) should simply be removed.
- Clean original panel thoroughly with a grease-dissolving agent.
- Plan where to place each sticker.
- Warm up plastic / fairings slightly.
- Align the sticker; use the screws and edges of the panel as a guide.
- Peel off the backing paper a little and heat the sticker slightly. Caution: Excessive heating can deform the sticker!
- Apply the sticker little by little, peeling off the backing paper as you go. Pay attention to the correct positioning and adjust as needed by pulling the sticker.
- Once you've applied the decal, heat it and remove any air bubbles and waves.
Note: In rare cases, it may be necessary to make small cuts to position a sticker perfectly. We recommend to use a cutter knife to do so.
Please note: We are not responsible for any injuries or damages caused by using the above tools. Always work carefully!
| Graphic Kit Blackbird Dream 4 YZF 250 / 450 2003-2005 | |
|---|---|
| Article no. | BB-43025734 |
| Weight | 0,41 kg |
| Series | Dream 4 |
| Brand | Blackbird |
| Product type | Decal kit |
| Part | Fairing Decal Kit |
